Table of Contents
About Shire
Shire (LandSlide Hazard mappIng framEwork) is intended as a support to streamline landslide susceptibility and hazard mapping using a Random Forest classifier. It provides support for repetitive steps in landslide susceptibility and hazard mapping such as input dataset generation including data pre-processing. It is a Python-based modular framework that can be complemented with individual modules necessary for answer individual mapping challenges due to the open-access nature of the code.
Shire was developed as part of the KISTE Project
Getting Started
Please make sure to set up a virtual environment before installing the prerequisites. This is important as some packages might have dependencies among each other. Furthermore the current version of the workflow still uses numpy.interp2d which has recently been announced to be decapitated.
The framework was developed using Python 3.7
Then, clone the repository to your local system and you are ready to go.
The master branch contains the version of the framework which contains the user interface. The branch expert_application contains the framework version in which the user manages the settings in a seperate settings-file (settings.py)
Prerequisites
The framework has been developed and tested on a MacBook Pro using MacOS Monteray 12.7. Testing of the framework on other operating systems is planned.
There are known issues with using the tkinter python package which is used for the gui in the python editor Spyder. In that case it is recommended to start the script from the command line using
python shire.pyInstallation
After setting up the virtual environment, clone the repository
git clone https://git-ce.rwth-aachen.de/mbd/shire.gitand then install the prerequisites in requirement.txt
pip install -r /path/to/requirements.txtHow to use Shire
Gui version
Necessary manual preparations
keys_to_include-file:
- format: csv-file
- list of feature names to be included as features in the mapping processing
- feature names have to match feature names provided in the data_summary-file
data_summary-file:
- format: csv-file
- table with the columns providing information on path where the dataset is stored, feature name, list of no data values, boolen parameter whether the dataset is categorical
- no column headers should be included
- all fields have to be provided
Running Shire
Shire can be intuitively started by running shire.py which launches the gui. The gui queries important user-defined parameters and data-specific information in order to then automatically create training and prediction datasets and/or create the susceptibility map using existing input datasets.
The initial window (see Fig. 1) covers the basic information on the resulting map:
 Fig.1: GUI for defining the general settings for the mapping project
- What do you want to do?: Here it can be defined what should be done in this run. The options can either be ticked individually or in various combinations. Training dataset and prediction dataset launch the training and prediction dataset generation, Map generation launches the susceptibilty map generation using already existing input datasets
- General settings: Resolution defines the resolution of the final map in meters, No data value: defines the value that shall be used as the value for missing data, e.g. -999, CRS defines the coordinate reference system that should be saved as metadata along with the map such as wgs84, Random seed defines the value to be used as random seed
- Save the settings for later use: if ticked, as soon as the submit button is pressed, a window is opened to choose the path to save the settings for later use as a pickle file. It will be saved as "settings.pkl"
- Import settings: if during a previous run the settings defined in this window have been entered and saved, this button allows to load the previous settings to save time
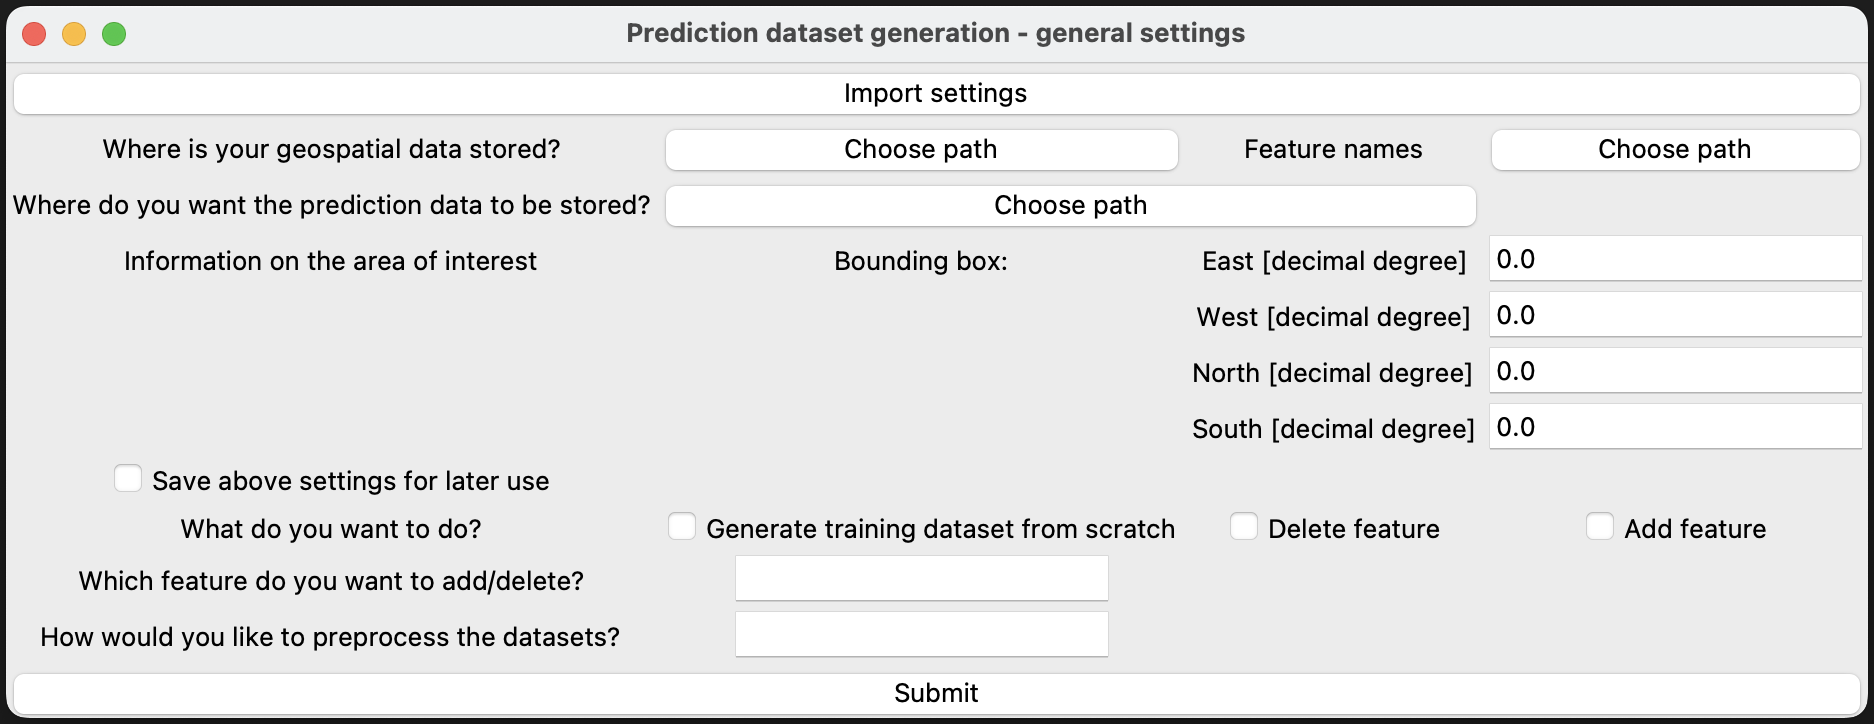
If in the general settings window the prediction dataset option has been ticked the following window opens:
| GUI when ticking the delete feature or add feature tickbox | GUI when ticking the Generate dataset from scratch |
|---|---|
 |
 |
- Where is your geospatial data stored?: Here, the path to the csv file needs to be given which provides information on the geospatial data (see Necessary manual preparations above)
- Feature names: the path to the list of features to include in the training dataset generation needs to be specified
- Where do you want the prediction data to be stored?: A directory can be chosen in which the prediction dataset will be saved. The dataset is stored as a netCDF4 file with the name "prediction.nc". More information on what the netCDF4 file contains can be found below
- Information on the area of intrest: under the four Bounding box input boxes West, East, North and South the boundaries of the area of interest need to be given in decimal degree.
- Save the settings for later use: if ticked, as soon as the submit button is pressed, a window is opened to choose the path to save the settings for later use as a pickle file. It will be saved as "settings_pred.pkl"
- What do you want to do?: This setting defines how the prediction dataset is generated. Generate the prediction dataset from scratch assumes that no prediction dataset in the directory given above is available to build upon, Delete feature assumes that there is a prediction dataset from which one or several freatures shall be dropped, Add feature assumes there is a prediction dataset to which one or several features shall be added
- If Delete feature or Add feature has been chosen Which features do you want to add/delete? defines which features to add or delete. If there are several, they should be seperated with a comma. Please don't include spacing!
- If Delete feature or Add feature has been chosen How would you like to preprocess the datasets? defines how the features that have been added in the inbox above. Options are 'no_interpolation', 'cluster' and 'interpolation'. Their meaning is described more closely below. For each of the features to add/delete one preprocessing option can be specified which are comma-separated. Please don't include spacing!
- Import settings: if during a previous run the settings defined in this window have been entered and saved, this button allows to load the previous settings to save time
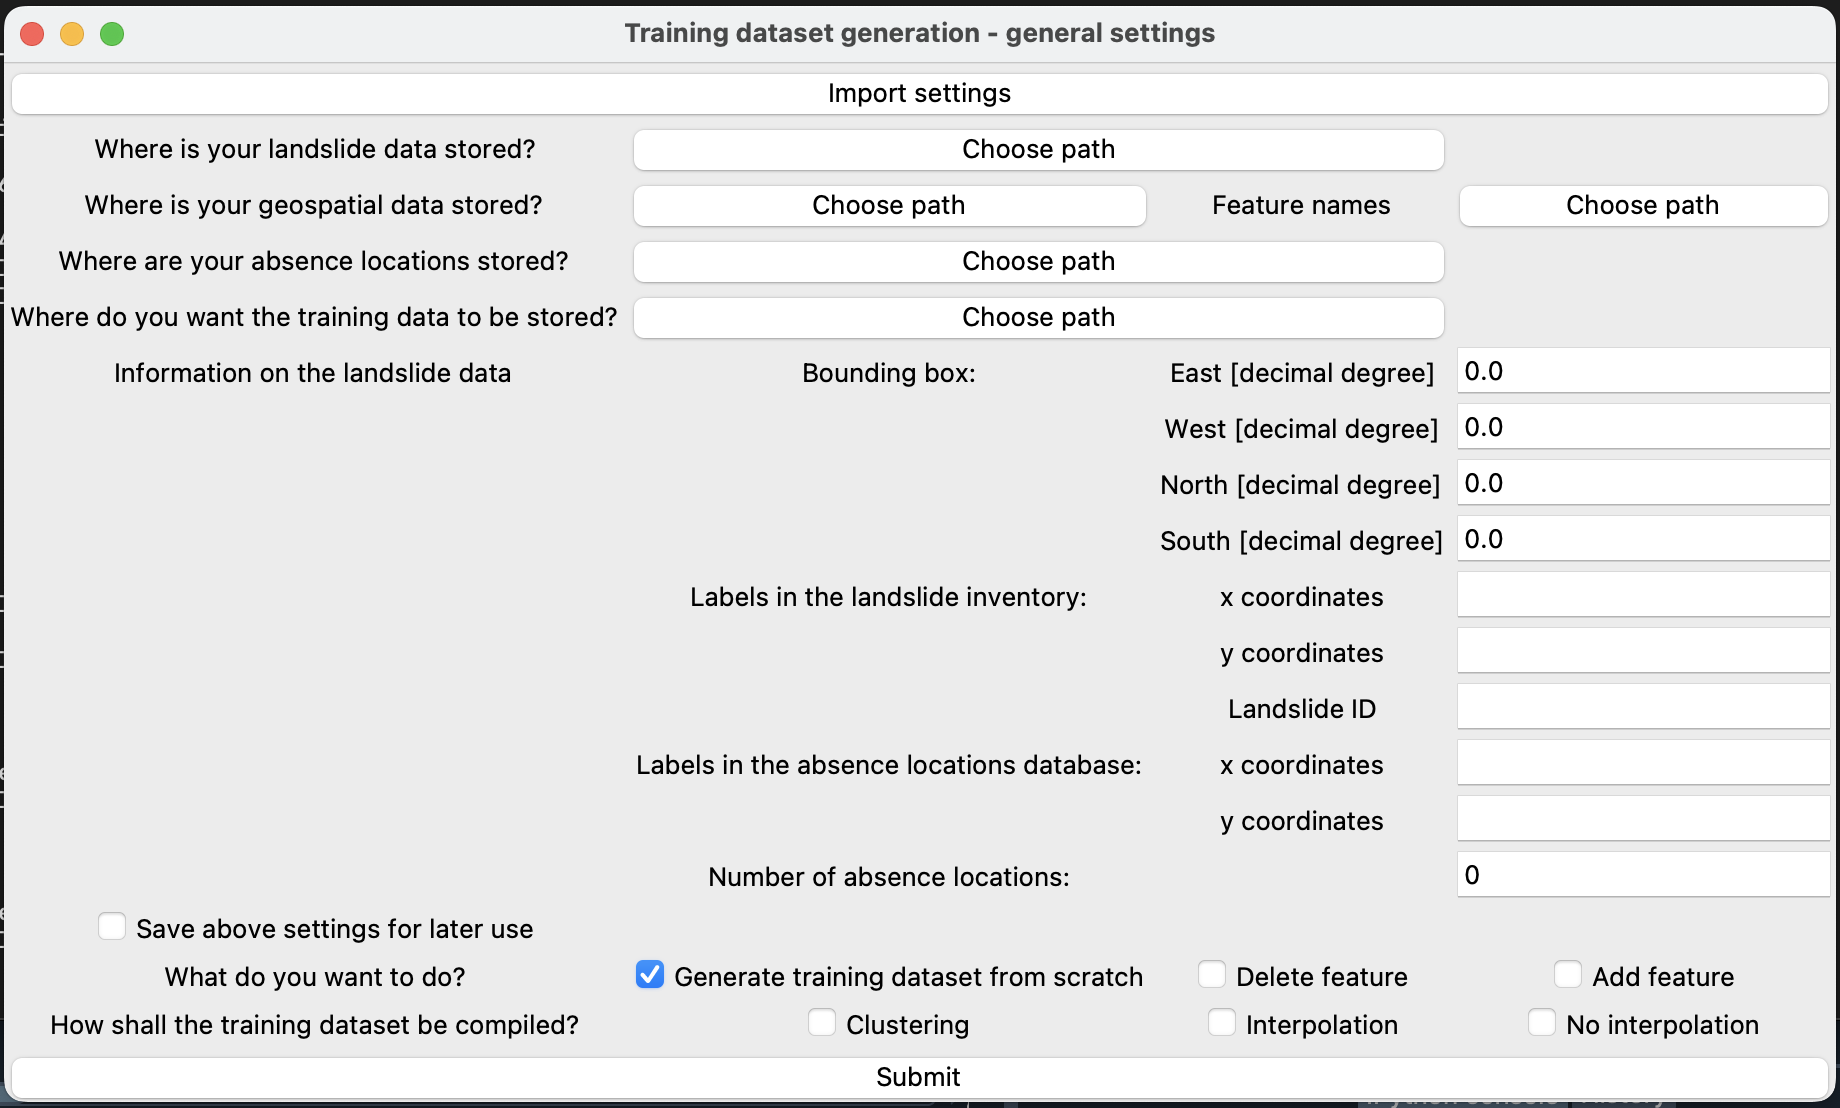
If in the general settings window the training dataset option has been ticked the following window opens:
| GUI when ticking the delete feature or add feature tickbox | GUI when ticking the Generate dataset from scratch |
|---|---|
 |
 |
- Where is your landslide data stored: The path to the landslide inventory needs to be given here
- Where is your geospatial data stored?: Here, the path to the csv file needs to be given which provides information on the geospatial data (see Necessary manual preparations above)
- Feature names: the path to the list of features to include in the training dataset generation needs to be specified
- Where are your absence locations stored?: The path to the absence locations needs to be given. For more information see necessary manual preparations
- Where do you want your training data to be stored?: Choose a directory to store the training dataset. The file is stored in csv format and is called 'training.csv'. More information on the resulting file can be found below.
- Import settings: if during a previous run the settings defined in this window have been entered and saved, this button allows to load the previous settings to save time -Information on the landslide data: To allow for individual landslide and absence locations inventories information on naming conventions need to be provided here. x coordinates and y coordinates require the labels in the landslide inventory and the absence locations inventory respectively for the x and y coordinates. Landslide ID requires the label for the landslide ID.
- Number of absence locations: This defines the number of absence locations included in the training dataset. Please follow the recommendations in the Necessary manual preparations section
- Save the settings for later use: if ticked, as soon as the submit button is pressed, a window is opened to choose the path to save the settings for later use as a pickle file. It will be saved as "settings_train.pkl"
- What do you want to do?: This setting defines how the training dataset is generated. Generate the training dataset from scratch assumes that no training dataset in the directory given above is available to build upon, Delete feature assumes that there is a training dataset from which one or several freatures shall be dropped, Add feature assumes there is a training dataset to which one or several features shall be added
- If Generate training dataset from scratch is chosen, How shall the training dataset be compiled? can be determined. The options are 'Clustering', 'Interpolation' and 'No interpolation'. More information can be found below
- If Delete feature or Add feature has been chosen Which features do you want to add/delete? defines which features to add or delete. If there are several, they should be seperated with a comma. Please don't include spacing!
- If Delete feature or Add feature has been chosen How would you like to preprocess the datasets? defines how the features that have been added in the inbox above. Options are 'no_interpolation', 'cluster' and 'interpolation'. Their meaning is described more closely below. For each of the features to add/delete one preprocessing option can be specified which are comma-separated. Please don't include spacing!
- Import settings: if during a previous run the settings defined in this window have been entered and saved, this button allows to load the previous settings to save time
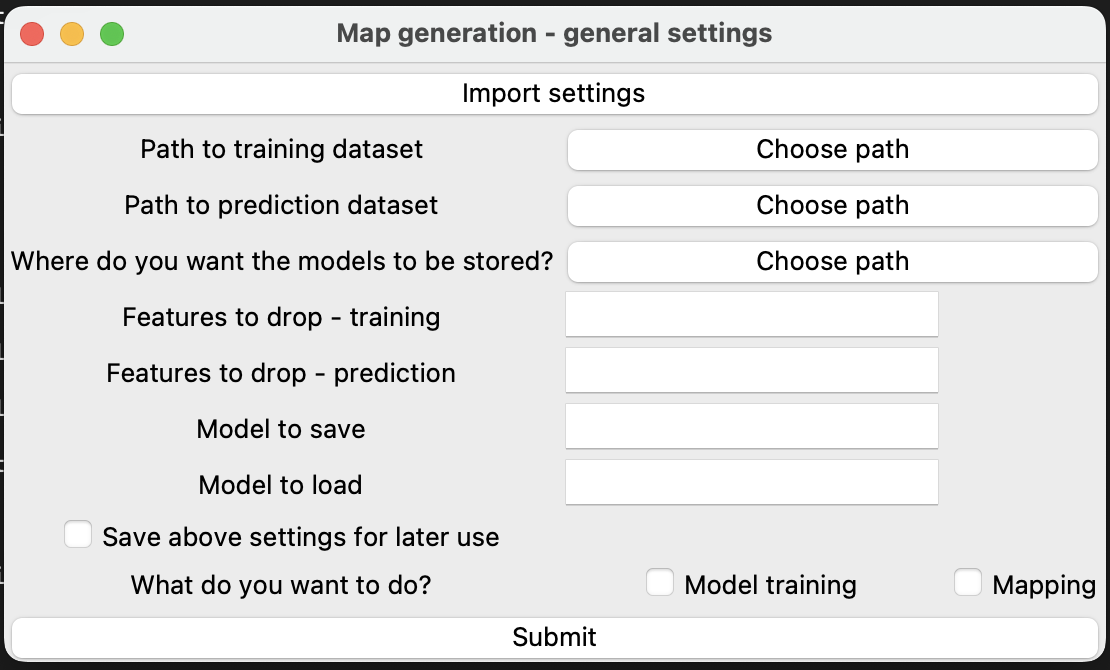
If in the general settings window the Map generation option has been ticked the following window opens:
 Fig.4: GUI for defining the settings for the map generation
- Path to training dataset: The path to the existing training dataset needs to be provided
- Path to prediction dataset: The path to the existing prediction dataset needs to be provided
- Where do you want the model to be stored?: The path needs to be provided where the model shall be stored
- Features to drop - training and Features to drop - prediction: If applicable list features that are included in the training or prediction dataset respectively that shall not be considered during training and prediction. If several features shall be dropped, seperate them with a comma. Please don't use spacing after the comma!
- Model to save and Model to load: Name of the folder in which the model shall be stored. It should not be generic so that specific models can be imported at a later point in time again. If training and mapping is conducted in one go, both parameters are typically the same.
- Save above settings for later use: if ticked, as soon as the submit button is pressed, a window is opened to choose the path to save the settings for later use as a pickle file. It will be saved as "settings_map.pkl"
- What do you want to do?: Model training and Mapping can be conducted in one go by ticking both boxes but can also performed independently.
Roadmap
- Feature 1
- Feature 2
-
Feature 3
- Nested Feature
See the open issues for a full list of proposed features (and known issues).
Contributing
Contributions are what make the open source community such an amazing place to learn, inspire, and create. Any contributions you make are greatly appreciated.
If you have a suggestion that would make this better, please fork the repo and create a pull request. You can also simply open an issue with the tag "enhancement". Don't forget to give the project a star! Thanks again!
- Fork the Project
- Create your Feature Branch (
git checkout -b feature/AmazingFeature) - Commit your Changes (
git commit -m 'Add some AmazingFeature') - Push to the Branch (
git push origin feature/AmazingFeature) - Open a Pull Request
License
Distributed under the MIT License. See LICENSE.txt for more information.
Contact
Your Name - @twitter_handle - email@email_client.com
Project Link: https://github.com/github_username/repo_name
